How to Export Content from VIDIZMO to SharePoint
This article outlines the step-by-step process for exporting content from VIDIZMO to SharePoint. For a detailed overview of this feature, see Understanding Content Export from VIDIZMO to SharePoint.
Prerequisites
- Verify that the Export App feature is enabled in your VIDIZMO Portal.
- Ensure you have a Microsoft Entra ID account.
- You must have a SharePoint site and hold the Site Owner role to manage integrations effectively.
- Ensure that a SharePoint document library is created before starting the export, and that any metadata to be exported is defined as a column in the library. Otherwise, the export will fail.
Register App in Entra ID
Before starting the export configuration, register a client application in Microsoft Entra ID. For detailed instructions, see the Azure documentation.
- In the Azure portal, go to Microsoft Entra ID.
- Select App registrations.
- Select New registration.
- On the Register an application page, complete the required fields:
- Enter a display name for the app.
- For the supported account types, select Accounts in this organizational directory only.
- In the Redirect URI section, select Web and enter your portal domain. For example:
https://your-portal-domain/api/v1/apps/Sharepoint/authorize.
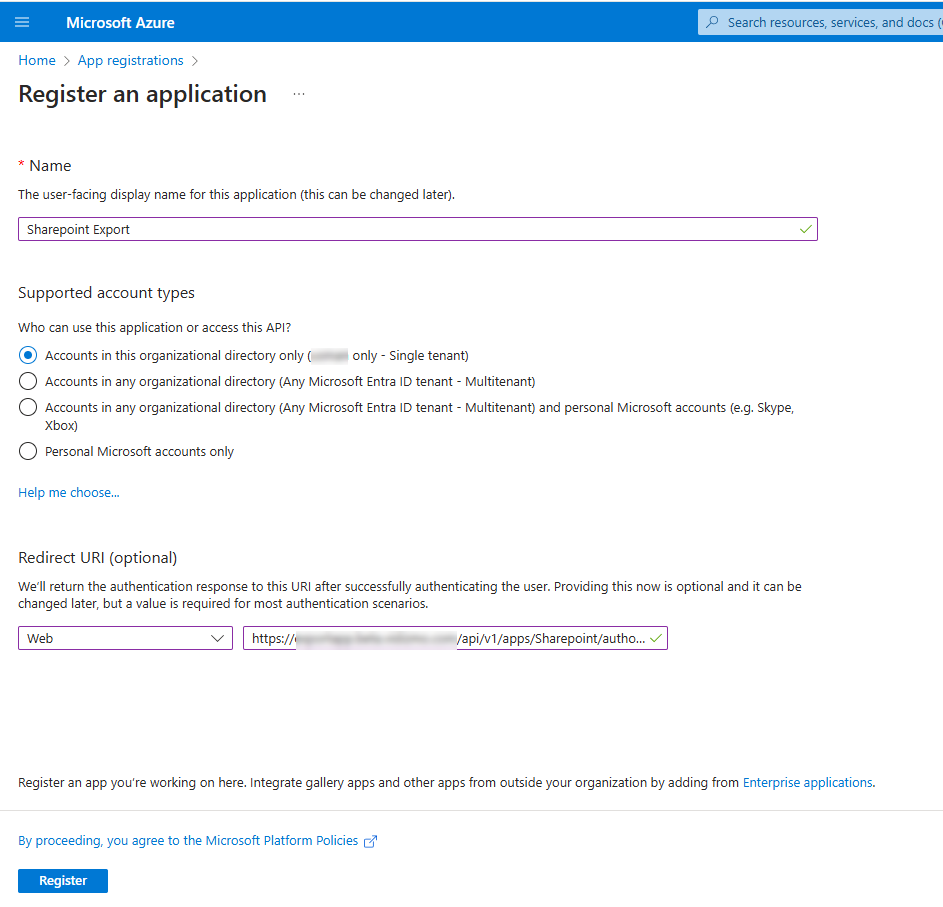
- Select Register.
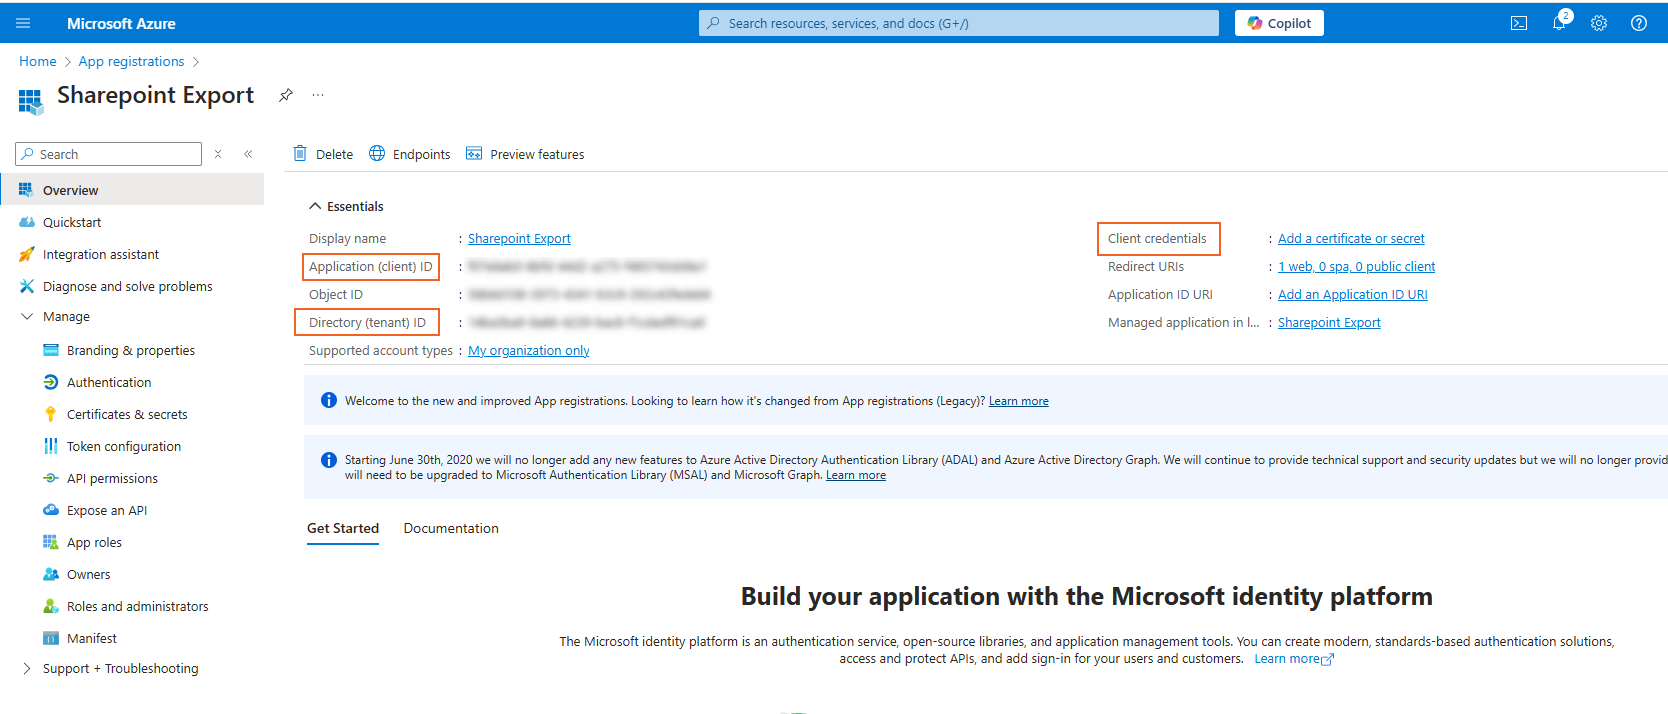
Application Credentials
After registering the application, you can find the Application (Client) ID and Directory (Tenant) ID in the Overview section.
To obtain the Client Secret, follow the steps in the Certificates & secrets documentation.
Save these values for use in the SharePoint Export App configuration in VIDIZMO.
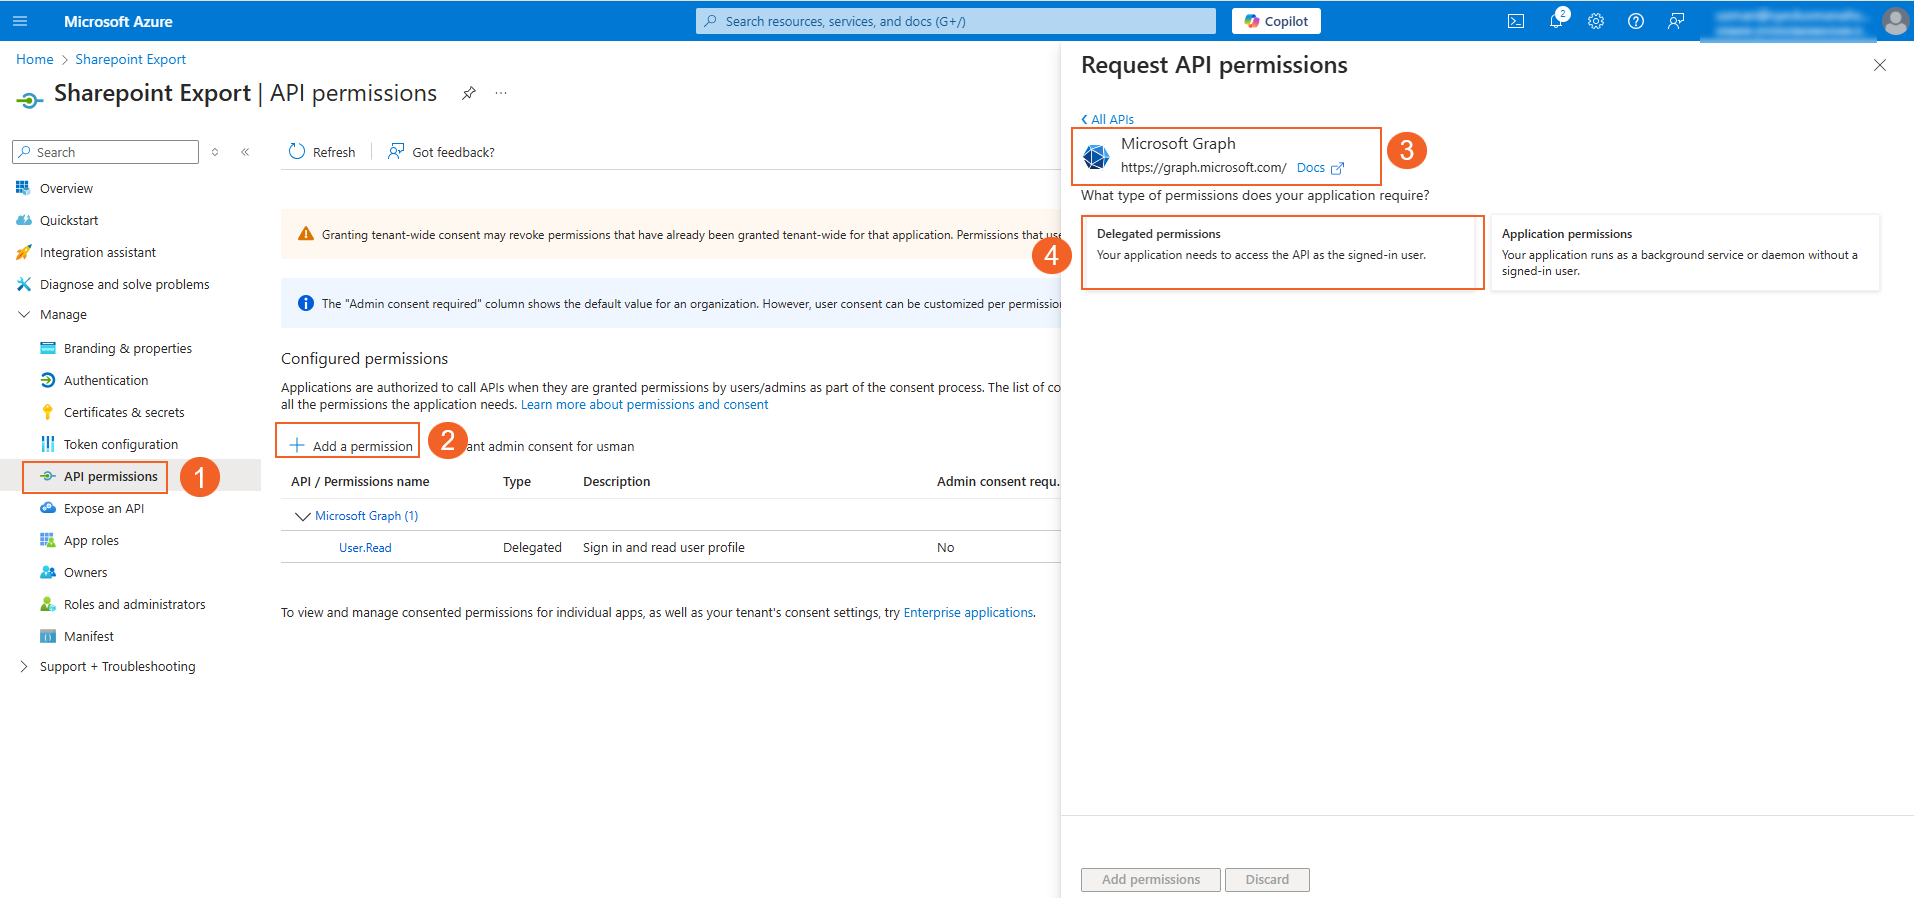
API Permissions
You need to define specific permissions in Microsoft Entra ID to access and modify the libraries where you export content.
- Go to the API permissions section.
- Select Add a permission.
- Select Microsoft Graph API.
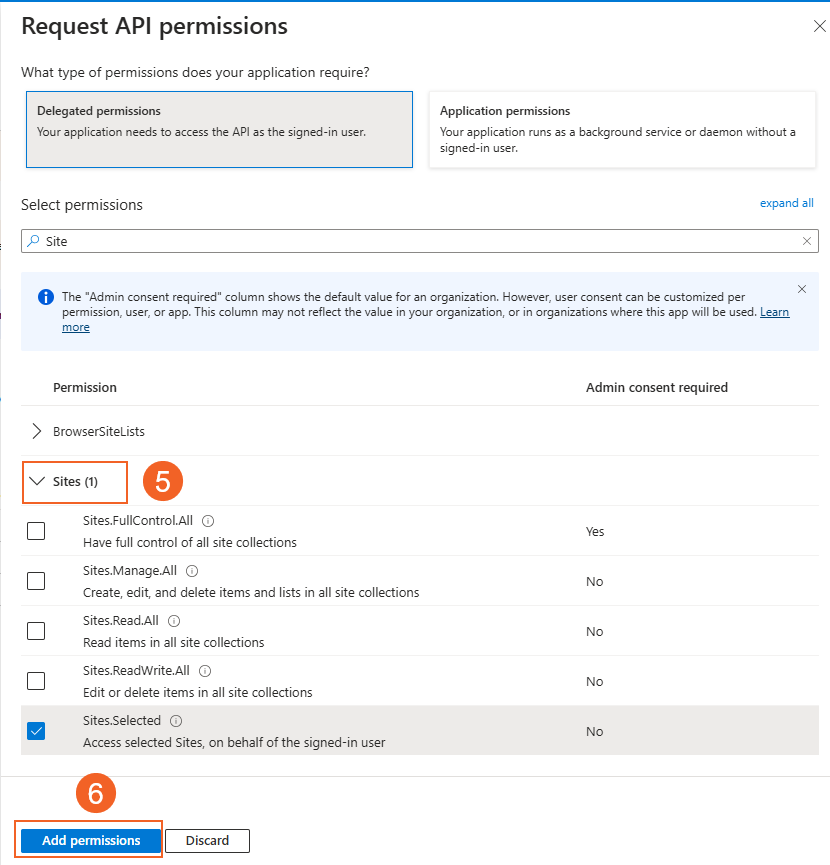
- Select Delegated permissions.
- Select the following permissions:
- Sites.Selected
- Files.ReadWrite.All
- Select Add permissions.
SharePoint Site
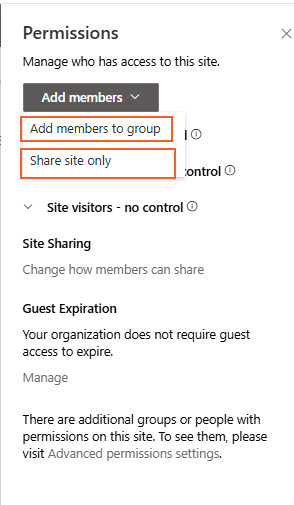
Create a SharePoint site and a document library to export content. To proceed with the export, you must grant permissions by either adding members to the group or sharing the site directly. Ensure the user is added to a site linked to the account where you registered the client application in Microsoft Entra ID.
Configuring SharePoint Export App in VIDIZMO
- In VIDIZMO, select the menu icon in the top-left corner to open the navigation pane.
- Expand the Admin section and select Portal Settings.
- Go to Apps > Integration Apps.
- Select Add New Apps.
- In the App Catalog, select the SharePoint Export App and select the Add button.
NOTE: You can configure multiple SharePoint Export apps to export to multiple SharePoint libraries, with each app assigned to a specific library.
- Select the settings icon on the SharePoint Export App.
- In the settings dialog, configure the following sections:
SharePoint Credentials
- Application ID An automatically generated ID assigned to the SharePoint Export App in the VIDIZMO Portal. This field is read-only.
- Tenant ID Enter the Directory (Tenant) ID from your registered client application in Microsoft Entra ID.
- Azure Region Select the region matching your client application in Microsoft Entra ID. Options are Global, Government, Germany, and China.
- Client ID Enter the Application (Client) ID from your registered client application in Microsoft Entra ID.
- Client Secret Enter the Client Secret of the client application in Microsoft Entra ID.
- Entra ID Authentication Select Sign In to authenticate and sync with your Azure account for delegated access. This button appears after the Tenant ID, Client ID, and Client Secret fields are filled in.
SharePoint Configuration
- Site Name Enter the name of the target SharePoint site where you want to export content from VIDIZMO.
- Document Library Enter the name of the SharePoint document library where you want to export content.
- Export Metadata From the dropdown, select the metadata fields you want to export. The selected metadata will appear as columns in the SharePoint document library after the export is complete. Available options include Title, Description, Category, Tag, Author, Date, and Content Id, as well as any custom attributes defined in your Portal. For each selected metadata field, you can customize the column header name that will appear in SharePoint.
Export Criteria
- Set the export criteria by selecting fields from the dropdown. At least one criterion is required. Available criteria fields include Status, Publishing Status, Formats, Tags, and content properties such as Clipped, Locked, Redacted, Featured, AI Processed, Transcoded, and Transcribed. Custom searchable attributes are also available depending on your VIDIZMO package and enabled applications.
- Use the plus button to add additional criteria rows and the delete button to remove a row.
- Export Existing Content Select Yes to export both existing content and new uploads. Select No to export only content uploaded after the Export App is enabled.
Post Export
- Action After Export
Select the action to perform on content after an automatic export:
- Leave as it is Retains the current status of the content in VIDIZMO.
- Delete and Move to Recycle Bin Removes the content from the Portal and moves it to the Recycle Bin.
- Select Save Changes to apply the settings.
- Turn on the toggle to activate the SharePoint Export App.
App Activity Logs
Whenever an export activity is performed, the system generates a log entry on the Activity Logs page. Each log represents a single content export activity.
For a detailed overview, see Understanding Activity Logs.
To access the Activity Logs, select App Activity Logs on the SharePoint Export App. You can apply filters to search for specific entries by title, start date, end date, user, status, or app name.
Each log entry includes the following details:
- Title The name of the content file exported from VIDIZMO to SharePoint.
- Identifier The app ID that performed the export. This is useful for distinguishing between multiple apps linked to different SharePoint libraries.
- Date and Time The timestamp when the export occurred.
- User The username of the individual who initiated the export.
- Status The final status of the export: Completed, Failed, or Content Not Found.
- Exported Files Count The number of files exported during the activity.